Jan 22, 2023

SPFx : Error loading debug manifests.

 Hi,

I recently upgraded my machine to windows 11 home version and when trying to build a SPFx application customizer extension for the first time, I have noticed this error.

"Error loading debug script. Ensure the server is running and the "debugManifestsFile" parameter URL is correct.

Error: Script error for: https://localhost:4321/temp/manifests.js http://requirejs.org/docs/errors.html#scripterror"


Resolution: Run gulp trust-dev-cert in your project location on the command prompt. Which creates a local certificate for development and debugging


Thanks,

Purna


Jul 16, 2020

Error in displaying Microsoft Forms in Forms Webpart on a SharePoint modern page : This is not a valid form link. Please copy a URL from Microsoft Forms.

Hi Guys,

This is a short post regarding an error when displaying the Microsoft forms on a SharePoint modern page using "Microsoft Forms" webpart.

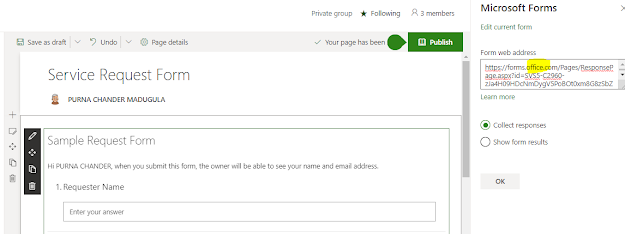
While giving the Microsoft Form url in Form address section of webpart, getting below error :

This is not a valid form link. Please copy a URL from Microsoft Forms


Resolution :

Change the address from https://forms.microsoft.com to https://forms.office.com 

like below :
https://forms.office.com/Pages/ResponsePage.aspx?id=AMTFSSVS5-C2960-zJa4H09HDcNmDygV5UVFHNE1aMTFFVDJNR1RKRElFSC4u


No idea on what is the logic behind this . Both links works for sharing and submitting the response. But only the url with office.com works in MS Forms Webpart on a SharePoint modern page.

Hope this helps some one !

Jun 22, 2020

Power Automate Get File Content - Displaying Images in flow email body from SharePoint though users dont have access to them

Hi,

Recently I got a requirement to build a scheduled flow (Power Automate) which sends emails to users to work on some tasks before they attend a training. That email body contains few images which were stored in a SharePoint Picture Library.

Issue : Images are not displayed to end users as they were not having access on the SharePoint site. One solution for this problem is, giving read access to all users (every one) on the site or at least on the picture library by breaking the permissions from parent. But due to some policy issues, we are not allowed to do that.

 So because of that when i am referring them with complete image path,  users are unable to see the images in the email .
<img src="https://mysharepointsite.com/TrainingMedia/PreworkSchedule.png" alt="img_training" / >
To overcome this issue, do the following
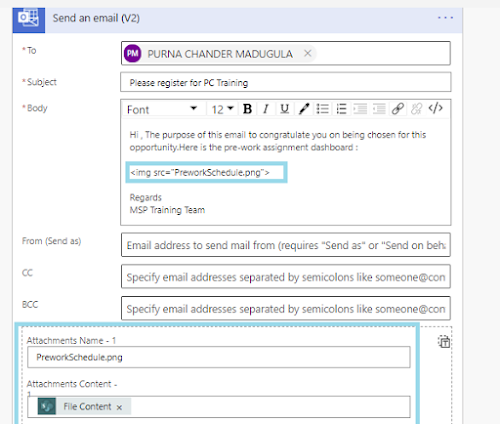
Resolution : Get the file content in flow and use it in email body.
Here are the steps to do that.
Using Get File Content Activity, browse the image

Then use this File Content in Send Email Activity ( To view the Attachment option, Click on "Show Advanced  Options" )
 [Updated Note ] : This is tested in M365 Desktop outlook client ( 16.0.xxxxx) and Mobile outlook client. But few users complained that, images are rendering as attachments instead in body. So it seems, this functionality depends on settings of how your outlook is configured.

Apr 4, 2020

How to read SharePoint Person or Group field in Power Automate ( MS Flow ) and Send email


Hi Guys,

This post is on a basic concept like reading the values of a SharePoint person or group field from Ms flow.  Recently i got a requirement to design a flow which reads the list item's metadata . During its design i noticed there is no direct way to read the values from the person or group field. ( at least by the time of writing this blog ). So i wanted to share the logic which i have implemented to achieve it.

Here is my requirement :

I have a field called Customers which is of type person or group with allow multiple sections . Which contains three people objects.  So in my flow i need to retrieve Customers email ids with a colon (;) separated and send an email to them.

Here is my Customers column :


Now lets design the flow to retrieve these

Here i am creating a flow with manual trigger action . The first action is Get Item


Add a Select - Data Operation activity and set From with the Customers field like below.

This Select operation takes only array as input.


Here this Customers object (Array) contains many attributes like display name, email id etc. But we are interested in getting email ids only.

So we need to map email ids object by a key value. Here my key name is keyCstmrEmailIds .
Map this key with Customers Email field like below ( make sure there is no empty space in the key )


So here is the complete Select Action :


Now using logical expressions retrieve these values.

Add a initialize a variable action and give the name of the variable as "varActualCustomerEmailIds" with type "array" and fill the Output of previous Select action. like below


Now initialize another variable of type string with name "varFinalCustomerEmailIdString" and leave its value as blank. We will use this variable to store the result email ids.


Now the varActualCustomerEmailIds  contains the CustomerEmailIds array (Output of Select Action ). Now we need to retrieve these one by one and combine then with semincolon ";".

Lets do this.

Add a Apply to each Action and add varActualCustomerEmailIds  .


Now we need to retrieve each email id from this varActualCustomerEmailIds array and concat them one by one with semi colon ";"

So add a Data Operations - Compose action and add below Expression to concat email id and semicolon.

concat(item()?['keyCstmrEmailIds'],';')


if you observe the keyCstmrEmailIds is the Key defined in above Select action . This contains output like emailId1;  
So now we need to append these result values in every loop item and store in a string variable.

Lets do that.

Add another Data Operations - Compose  action and assign Output of previous Compose action like below


And append string variable varFinalCustomerEmailIdString  to it ( So complete Compose2 action looks like below)


Now store this appended value to the same string variable varFinalCustomerEmailIdString   like below.

Add a Set Variable action and set varFinalCustomerEmailIdString  with  Output of Compose 2 action like below


DONE.  Now varFinalCustomerEmailIdString contains the email ids with ";" attached.

Lets send an email with To address as this varFinalCustomerEmailIdString  variable.


Here is the email to three customers ( From the list item Customers field ).


Hope this helps some one !

Thanks
Purna

Feb 8, 2020

Generating word document from SharePoint Online list items using MS flow (Power Automate) built in connectors

Hi Guys,

In this post I am going to show how to generate a word document from SharePoint online list items using MS Flow (Power Automate ).

Here are the high level steps of this procedure

1> Product List & Inventory Library Creation
2> Product CT Content Type Creation
3> Product CT Content Type Association to Inventory library
4> Word Template Creation using Quick Parts
5> Design MS Flow using built in actions ( no custom connectors used )
6> Word document generation in Flow using Word template

Create a custom list called "Products" with below columns


Create a Library called "Inventory"

Create a Content Type called "ProductCT" of type "Document". Add the site columns same like in Products list with little change to understand they are from content type.


Associate this content type to Inventory Library
Go to Library -->Advanced Settings -->Allow Management of Content Types --> Yes

Then Add this "ProductCT" to this library ( Content Types -->Add from Existing Content Types --> Add Product CT)

Now add a Document using this "ProductCT" from the New Item menu like below :


Then Word window will open in browser. Then without writing anything, just download it to your computer ( File-->Download a Copy ). Then rename it to "InventoryTemplate" with same extension of docx.

Then Open it --> If it asks, click on Enable Editing

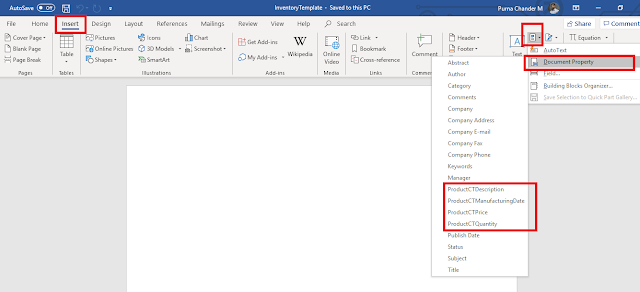
Then Click Insert Tab-->Explore QuickParts-->Document Property. Then you can see your content type columns here like below


Now its time to build your template using these columns. Here is my sample template.


Save it to your computer ( Name : InventoryTemplate.docx ) and then Upload to our "Inventory Library".


Now the template is ready. Its time to design MS Flow ( Power Automate ) :

We are going to design a MS Flow which is triggered when a list item is created in Products List. This flow uses the InventoryTemplate.docx as the template to create a new word document. The fields in template will be filled by the respective values in Products List columns.

Here are the steps :

go to flow.microsoft.com and create a flow using below steps

New --> Automated from blank --> give name and select the trigger as when item is created in SharePoint


Click Create.

Then in When Item is Created Action , Select Your Site Url and List Name as "Products"


Then Click on New Step and add a action called "Get File Content (SharePoint )"

Give Site Address and for File Identifier field select "InventoryTemplate.docx" from "Inventory" library using Show Picker icon.


Then add another step with a action called "Create File (SharePoint) "

Give Site Address .
Folder Path as "Inventory" library.
File Name : [Title]_InventoryReport.docx
File  Content : [FileContent] ( this is the output from previos Get File Content step )


Then add new step and then add a action called "Update File Properties (SharePoint )"

Site Address : Site URL
Library Name : Inventory
Id : [ItemId] from the "Create File Action"
Title, ProductCTDescription, ProductCTPrice, ProductCTQuantity,ProductCTManufacturingDate : Set the respective fields from "Create File Action " like below


The over all flow should look like this ( due to screenshot size, showing with closed actions )


Save it .

Now test it by creating an item in Products List . Here are the steps

Click Test --> I will perform the trigger action --Save & Test . It will open a window which waits for list item creation.

Now go to Products List and create a item :


Now the flow will trigger and it creates a report with name as "Wireless Keyboard _InventoryReport.docx (word document ) in "Inventory" library as below :


Now download the document to view the content.   As mentioned previously, this generated word document will not work in word online since we used the QuickParts (Document Properties ).

Here is the generated word document looks like : ( If you notice, the document QuickParts are replaced by the respective list item field values )


So this way, we can generate a word document from sharepoint list item.

Though there is a limitation of opening this generated document in browser/word online, this  use case is very useful in real time project scenarios.

Hope you liked it .

Thanks
Purna

Jan 6, 2020

Adding Emojis to SharePoint Navigation Menu Items, Site Title etc.

Hello guys,

Adding Emojis to SharePoint Links is a cool feature.  Here are the steps to do this.

Edit your Menu Item --> Click "Windows" and "." keys on your keyboard at a time. It will open a window with all emojis like below


Select an Image and Save the item.

Also you can copy the emojis from this famous site https://emojipedia.org/ Also, you can apply these emojis for your site title and descriptions as well. 

Here is the image :


Dec 29, 2019

Transform Classic Page to Modern Page using PNP Powershell - SharePoint Online

Hello guys,

As the current trend is migrating on-premise versions of SharePoint to online, we definitely come across with a requirement to convert the classic sites to modern sites .

In this post i am going to show how we can transform the classic SharePoint page to modern page. There are couple of approaches to do this transformation,  like using PowerShell, .Net and SharePoint Transformation UI using ModernizationFramework .

In this post i am explaining the PowerShell method. The PnP Powershell provides a way to transform the classic SharePoint page to modern SharePoint page.

Before looking in to this code, I just wanted you to have a look of how my SharePoint Classic Page looks before transformation. Here is a sample Classic Home Page with four webparts on it.


This Classic page contains default tiles webpart with two list view and one image webpart .The layout being used here is Three Columns with Header.

Now its time to look in to the transformation PnP commands:

The prerequisite to this script is PnP Powershell module. If you don't have it already,  install it using below command .  This will install the latest PnP powershell version

Install-Module SharePointPnPPowerShellOnline

This transformation script requires a PnP Powershell 3.4 or higher . If you already have the older version and want to upgrade to latest , run the same command with '-Force' parameter .

Install-Module SharePointPnPPowerShellOnline -Force

Once we are ready with PnP, run the below script to transform the page :

Connect to the site where your page exist and convert to Modern page by giving its name ( here DevHome.aspx is the name of my classic page )

Connect-PnPOnline -Url https://mad429.sharepoint.com/ 

ConvertTo-PnPClientSidePage -Identity DevHome.aspx


Once the conversion is done, it creates a modern page with name Migrated_[Classicpagename].aspx. In this case the converted page name is Migrated_DevHome.aspx.


Below is the Converted Modern Page ( Migrated_DevHome.aspx) with the four webparts as in classic page.


If you want to keep the original name to modern page, there is a parameter called "TakeSourcePageName". This creates the modern page with the Classic Page Name and keeps the classic page name as Previous_[ClassicPage].aspx

ConvertTo-PnPClientSidePage -Identity DevHome.aspx -TakeSourcePageName

There are couple of parameters avail for this ConvertTo-PnPClientSidePage command. Here is the link from msdn where you can find complete details of this powershell approach.

Also, there is an option of giving end users to decide whether they can keep the transformed version of page or discard it. This can be done using AddPageAcceptBanner parameter to the above command and installation of PageBanner Webpart. This is still evolving topic, please refer here for more details.

If you notice the above transformation , all four webparts are transformed perfectly to modern look and feel . But this is not true for all the webparts . There are few webparts/functionalities may not supported by this transformation. So get ready with your re-design approach before jumping in to transformation.

In this post i just showed the transformation for one page . But you can write for all site pages with different parameters as per your need. Refer this Microsoft Docs Link  for more details about this  evolving topic.

Hope you like this post !