Hi Guys,
In this post I am going to explain you how a custom button can be added to the SharePoint Ribbon and how to raise an event with it. Here I am planning to add a custom button with an event to open a application page.
These are the steps involved in this
Open Visual Studio 2010 and create a new Empty Sharepoint Project (Here I am deploying as a farm solution) and named it as My Ribbon.
Now add a feature to the project
![]()
and name it as My Ribbon Demo Feature (also give description if you need )
![]()
Then add empty element to the project
![]()
![]()
![]()
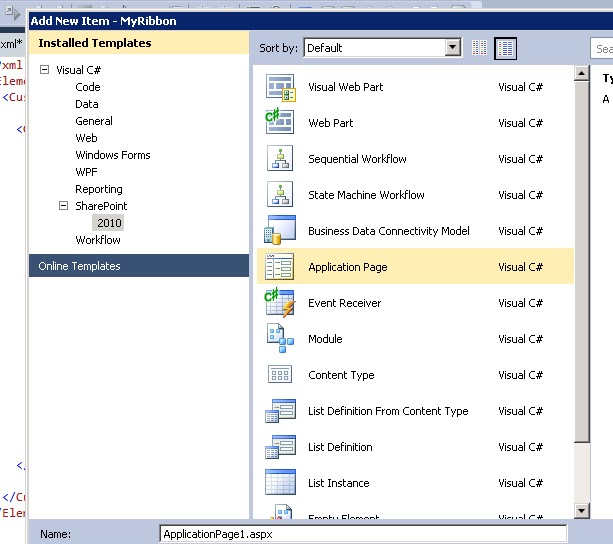
Then Select the application page and name it as ApplicationPage1.aspx
![]()
![]()
Add a Image to the project for the button. Select Project then add SharePoint Images Mapped Folder
![]()
![]()
![]()
Check the feature status.
Open the site (where we deployed the solution). Site ActionsSite SettingsManage Site Features and then check our feature activated or not.
![]()
Now check the custom button in the ribbon . Go to Shared Documents(or any library) then select a item/folder in it. You will see our custom button added as a tab in the ribbon with My Button as text (see below fig)
![]()
Now check the event for it.Click the button, our applicationpage1.aspx will be opened.
![]()
In this post I am going to explain you how a custom button can be added to the SharePoint Ribbon and how to raise an event with it. Here I am planning to add a custom button with an event to open a application page.
These are the steps involved in this
- Create a Empty SharePoint project
- Add a Feature to it
- Add an Empty Element to project
- Add an Application page to project
- Add a Image to the project
- Define the schema for Elements.xml
Open Visual Studio 2010 and create a new Empty Sharepoint Project (Here I am deploying as a farm solution) and named it as My Ribbon.
Now add a feature to the project

and name it as My Ribbon Demo Feature (also give description if you need )

Then add empty element to the project

Then select empty element and give name as MyRibbon Element
![]()
Then you will get an Elements.xml with this empty element like this
Now we need to add the schema/configuration stuff in to this xml file.
As I explained earlier here my objective is to add a custom button to the ribbon with an event to open the custom application page.
So now add an application page to the solution. Select the Project then say add new item

Then Select the application page and name it as ApplicationPage1.aspx
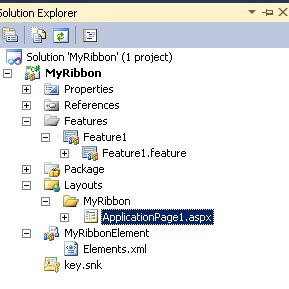
Now our solution structure will be look like this
Add a Image to the project for the button. Select Project then add SharePoint Images Mapped Folder

Then a folder with project name(MyRibbon) is added to the solution then add an image to it .
For this select MyRibbon folder and add existing item then upload the image. Here i am uploading from my pc and its name is pcm.jpg(text:New)
For this select MyRibbon folder and add existing item then upload the image. Here i am uploading from my pc and its name is pcm.jpg(text:New)

Now write the below lines in to the Elements.xml file . Replace elements tag with this.
<Elements xmlns="http://schemas.microsoft.com/sharepoint/">
<CustomAction Id="DemoHello" RegistrationType="List" RegistrationId="101"
Location="CommandUI.Ribbon">
<CommandUIExtension>
<CommandUIDefinitions>
<CommandUIDefinition Location="Ribbon.Documents.New.Controls._children">
<Button Id="Ribbon.Documents.New.Controls.DemoHelloWorldButton" Alt="purnaImage"
Image32by32="/_layouts/images/MyRibbon/pcm.jpg"
Command="Mydemo_Command" LabelText="MyButton" TemplateAlias="o2"></Button>
</CommandUIDefinition>
</CommandUIDefinitions>
<CommandUIHandlers>
<CommandUIHandler Command=" Mydemo_Command"
CommandAction="javascript:
var dialogOptions = {
url: '/_layouts/MyRibbon/ApplicationPage1.aspx',
title: 'Custom Ribbon Button PopUp',
allowMaximize: true,
showClose: true,
width:500,
height:400
};
SP.UI.ModalDialog.showModalDialog(dialogOptions); " >
</CommandUIHandler>
</CommandUIHandlers>
</CommandUIExtension>
</CustomAction>
</Elements>
Once it is done deploy the solution.

Check the feature status.
Open the site (where we deployed the solution). Site ActionsSite SettingsManage Site Features and then check our feature activated or not.

Now check the custom button in the ribbon . Go to Shared Documents(or any library) then select a item/folder in it. You will see our custom button added as a tab in the ribbon with My Button as text (see below fig)

Now check the event for it.Click the button, our applicationpage1.aspx will be opened.

Now only thing we need to concentrate here is the lines which were written in elements.xml file.
The elements.config file contains different sections and some of them are here..
Custom Action : This element tells us that which custom action we are writing/adding to sharepoint. The location atribute defines the location of the sharepoint element(like ribbon tab etc..)
CommandUIExtension : It contains the information about the controls and the actions of them.
CommandUIdefination : It contains the definition of control like its properties.
CommandUIHandler : This deals with the action/work of the control.
For more information about these tags refer the post from msdn.
Happy reading..!


