Dec 26, 2013

SharePoint 2013 Work Flow cancelled automatically due to error :HTTP 401 {"error_description":"The server was unable to process the request due to an internal error...}

Hi Guys

Recently I have installed and configured the WorkFlow Manager for my project and i got succeded in doing that. And then I have created a spd workflow and published it, but when I see the history it is saying the workflow is  started but after that it got cancelled automatically by saying this below error

RequestorId: 26f1da47-f3e6-0816-0966-df958cd57c7d. Details: System.ApplicationException: HTTP 401 {"error_description":"The server was unable to process the request due to an internal error. For more information about the error, either turn on IncludeExceptionDetailInFaults (either from ServiceBehaviorAttribute or from the <serviceDebug> configuration behavior) on the server in order to send the exception information back to the client, or turn on tracing as per the Microsoft .NET Framework SDK documentation and inspect the server trace logs."} {"x-ms-diagnostics":["3001000;reason=\"There has been an error authenticating the request.\";category=\"invalid_client\""],"SPRequestGuid":["26f1da47-f3e6-0816-0966-df958cd57c7d"],"request-id":["26f1da47-f3e6-0816-0966-df958cd57c7d"],"X-FRAME-OPTIONS":["SAMEORIGIN"],"SPRequestDuration":["252"],"SPIisLatency":["1"],"Server":["Microsoft-IIS\/8.0"],"WWW-Authenticate":["Bearer realm=\"73b2c214-338d-4c93-937f-5852744a020d\",client_id=\"00000003-0000-0ff1-ce00-000000000000\",trusted_issuers=\"00000005-0000-0000-c000- ---

This issue comes because, the Workflow Manager tries to authenticate SharePoint with the OAuth. Here only the Identity information is passed through the OAuth token. The rest of the information about the user is picked from the User Profile Service Application by the SharePoint.  So the UPS service application should be up and synchronized. 

Follow/Check  these below steps to resolve the issue :

  • First Check the user(  with whom you are publishing the workflow  )should not be a system account
  • Check that the User Profile Synchronization service is running and Full Synchronization is done
  • Make sure that the user with whom you are publishing the workflow should be available in User Profile List. If not add the user by going  this below path  Central Administration--> Manage Service Applications --> Select User Profile Service --> Manage --> Manage User Profiles --> New Profile and then fill the details.

This will resolve your issue..


-Thanks

Dec 20, 2013

Reusable Content in SharePoint 2013


Hi guys,

This is a small feature to reuse some kind of HTML and text in various places from a centralized storage when you are authoring the documents. Basically this is a list which is available with the publishing sites.


Reusable Content list have these columns


Title :  This is the name of your content.

Comments:  like a description about your content like for which purpose you are writing this...

Content Category: To categorize your content in to different groups. This is a choice filed you can add your own new category by editing this column in list settings. (List SettingsàClick on this columnà Add new category in the choice box)

Automatic Update: This is an important column, which says that if you check this box this content will be added as a “read-only” reference in the instances (where we use this) and if any changes made to this original content this will be applied to all those instances.. If we not check this box, then this content will be used as a copy in the instances and the content in the instances can be modified directly and also the automatic updates will not be done in the instances if we change this original content…

Show in drop - down menu: If we select this option , this reusable content item will appear as a dropdown menu in editing mode of the page this gives conten authors a quick way to add this item in to the page.

Reusable HTML : This is the field where you will add your content which needs to be reused.

Follow these steps to create and use the reusable content.

Reusable content Item creation.

Here I am filling some info related to SharePoint introduction


Here I created some content and checked the automatic update column .

Now , how can we use this content .?

Create a webpage and add the content like this


Assume, we are using this content in 20 pages. And if there is any small change just like a spelling mistake in the content, we need to change the content in all those 20 pages page by page . And also since this is a Publishing Site every page needs an approval after the change..this needs so much efforts. But with this cool feature(with automatic update option) you can change at one place which will be applied across all the 20 pages like this..


Here I am changing the heading SharePoint Overview to SharePoint 2013 Introduction..


See how it applied on our webpage..


Note : This feature also available with 2010. And this can be done programatically too...

So start using of this feature and save your time..!!!

Thanks,


Oct 25, 2013

Displaying Site Title, Site Description on the Custom Master Page in SharePoint 2010


Hello,

Recently I got a requirement to add the default site description in the custom master page. But the default placeholder which providing this functionality didn’t work in this case.
Generally the site description can be set @ Site ActionsàSite SettingsàTitle Description and Icon under Look and Feel Section, like this


The site description looks like below with the default master page (v4.master here) on the home/welcome page.


If you look in to the design of the default master page, the site description will be served by the placeholder called “PlaceHolderPageDescription” .


But in the custom master if  you place this div to show the site description , this will not work.
The workaround to this is, add a project property to the custom master where you need to show up the site description, like this
 
<SharePoint:ProjectProperty Property="Description" runat="server"/>
 
In this way you can use these properties in your custom implementations to get the default SharePoint data. Some other properties I am listing here..
Site Title:                   <SharePoint:ProjectProperty Property="Title" runat="server"/>
Site Owner Name:   <SharePoint:ProjectProperty Property="SiteOwnerName" runat="server"/>
Site Url:                     <SharePoint:ProjectProperty Property="SiteUrl" runat="server"/>
 
 Thanks,


Jun 28, 2013

New Event Recievers in SharePoint 2013

Hi guys,

This is a small post about the new event recievers which are introduced in 2013. As many of us know, eariler there was no default mechanism to trap the events that are raised for the security related activities like  user addition, group addition,Inheritance breaking etc ..

Generally , In daily project works we get a situation to track and do some custom actions/functionalites when the inheritance is broken and when a new user is added to the global groups etc..At that times we used to write a custom solutions for them. But from 2013 we can achieve these functionalities using the default OOB event rx.

To achieve this, our custom security event rx  class should be derived from SPSecurityEventReceiver Base class.

These are the methods which are availabe with this SPSecurityEventReceiver class.Here are categorized as user, group ,role and inheritance..

User Events:
  • GroupUserAdded
  • GroupUserAdding
  • GroupUserDeleted
  • GroupUserDeleting 
Group Events:
  • GroupAdded
  • GroupAdding
  • GroupDeleted
  • GroupDeleting
  • GroupUpdated
  • GroupUpdating 
Role Events:
  • RoleAssignmentAdded
  • RoleAssignmentAdding
  • RoleAssignmentDeleted
  • RoleAssignmentDeleting
  • RoleDefinitionAdded
  • RoleDefinitionAdding
  • RoleDefinitionDeleted
  • RoleDefinitionDeleting
  • RoleDefinitionUpdated
  • RoleDefinitionUpdating 
Inheritance Events:
  • InheritanceBreaking
  • InheritanceBroken
  • InheritanceReset
  • InheritanceResetting
Find more info about this class from msdn.

Thanks,

Jun 5, 2013

Shredded Storage in SharePoint 2013


This is a new architectural improvement related to management of data storage (large binary objects) in SharePoint 2013. In this post I am just giving you an overview of what this concept is and what is the importance of it ,but I am not going in to deeper details here.

Why Shredding?

In 2010, if we create a new version of a document in the library, the new version was resulted to a new independent BLOB , and this leads to the size of the db keep increasing as you create more versions. So to avoid this unnecessary space consumption, In 2013 they came up with a mechanism called shredding .

In 2010, for e.g. if we upload a file of 10 MB and if it has 10 versions the total size it would take 100MB to store in db. Even just for a small change like meta data change or a simple new line addition to the file content, another 10 Mb will be taking to store this new version. This will be a very huge performance issue in large environments where there are millions of records and their versions. But in shredding , it stores only the changes which were made to it,  instead the entire file.

How to configure this?

Nothing to do anything from our side, by default the shredded storage is enabled. But if you want to disable or re enable you can do it per web application basis.

What happens internally?

The shredded storage does the shred (or chunk) the BLOB in to many smaller shreds or pieces, so the single blob will be constructed in to many chunks . So now when a file is changed, these changes(only changes) are added to the storage but the previous version changes are just associated to this storage as a reference (that means here the previous changes are not taking the space with this change). While requesting for a particular version it combines all the shreds which are associated with this version and gives the response.

Here I am not showing any test runs to show how much storage is occupying with 2010 and 2013(with shredding), but to know the storage numericals on this topic, refer this article from msdn  .

Thank you,


May 29, 2013

Image Renditions in SharePoint 2013

There is a new cool feature introduced in 2013 called Image rendition, which is very helpful to the content writers to crop or resize (technically ‘Optimize’ J ) the images on the fly. In 2010 there was no such kind of feature to change the image sizing through the UI. For this we used to approach the designers. But with this Rendition feature in 2013, we can resize/crop the images in a simple way.
This feature improves the user experience for the sites by optimizing the images. The original (actually uploaded) image will be saved in the site and you can use different scaled sizes of the image throughout the site.
This will be very helpful when posting content, writing blog posts and developing mobile applications which has images.
These are the prerequisites to enable this feature
1>     Enable the Blob Cache for the webapp where you need this feature
2>     Publishing Feature must be enabled(if your site is not using publishing template)
Here I am taking the publishing portal to show you this. (so my 2nd prerequisite is done)
Now
Enabling the Blob Cache:
The dynamic changes in the images affects the performance of the application, internally the image rendition capability depends on the Blob Cache to cache the renditions. So to work this feature perfectly without any performance impacts, enable the blob cache for your web application.
For this go to the web.config of your webappplication and make sure that Blob Cache is enabled like here
Now go to the site settingsàSelect Image Renditions under Look and Feel Category
You will find some of the predefined renditions like this
 
You can edit, delete these existing or you can create the new rendition.
So now let’s have a look how these works,
Upload a picture in to the image gallery and click on the … symbol to open the menu. And then select the Edit Renditions
Then you can see the image with different renditions (The default four renditions)

Now, I am editing the third “Display Template Picture On Top” rendition. By default it has 300x100 in size. I am cropping the image to show only bottom portion like this.

So we have edited the image (here I have cropped it, you can set the size by creating the new rendition too). So now use this on the page.
I have created a page and inserted my uploaded (original) image on to it.

Now, I am selecting the third rendition (which we modified earlier i.e “Display Template Picture On Top”) .So the image changes to its scaling, like this

And save it.

Some other information about renditions:
·         This rendition is not only for images, this can be used with videos too.
·         It supports lot of image and video types(like jpeg, png, wmv ,avi etc)
·         All the image rendition information you can see at 
              ~yoursitecollectionurl/_catalogs/masterpage/PublishingImageRenditions.xml
·         You can programmatically do the renditions using the ImageRendition and ImageRenditionCollection classes.
·         When we use an rendition for the image, SharePoint will append an Rendition ID to the image url, which will be used to load the renditioned image instead the original image on to the page when requests it.

This is all about Image Renditions...!
Thank you.
 

May 15, 2013

Developing a SharePoint-Hosted App in SharePoint 2013 Part -I

Hi Guys,
This is the first post from me on SharePoint 2013. As part of R&D on SharePoint 2013 Apps, I got some good information from the msdn site and others. So I wanted to share with you…
Before start reading this post, have a look at this post to know basics about apps and why aapps?
In simple words, apps are of three types based on their hosting model
SharePoint Hosted: If you deploy/install your app with in the sharepoint server it is called sharepoint hosted app. In this, when we deploy the app a sharepoint site will be created and all the app content stored in the sharepoint itself. The app content will be lists/pages/content types etc.   
Auto Hosted (Azure): If we host the app on Windows Azure, it is called auto hosted. The app will sit in the cloud, we will download and install this app in to the sharepoint. When we install, the app will automatically create a site and provides us a windows azure site.
Provider Hosted: If you host your app in any other cloud (other cloud providers) environment, it is called Provider hosted. The logic and code related to app will be resided external to sharepoint. The code/logic might be in C# or JavaScript or php or java or anything. Here sharepoint just work as a place holder for the app.

Apps are isolated identities and they need a separate domain(called app domain) to deploy/install.one app cannot communicate with other apps. Once you deploy/install a sharepoint hosted app, it creates a separate site.
 i.e. http://[Appprefix]-[App Id].[App domain name]/[AppName].
Now let's create a simple sharepoint-hosted app with a static text and an alert message..
Developing a SharePoint Hosted App :
Go to visual studio 2012 à Create -> New -> Project -> select Office/Sharepoint category and then select the Apps under that.
Choose the App for SharePoint 2013 template .And give the required information

Give the name of the app, the url of the sharepoint site, give the hosting option as “SharePoint-hosted”. In this post I am showing only how to develop a sharepoint hosted app. If you want to deploy your app to windows azure, you need to select the “Auto-hosted”. If you want to deploy your app to any other cloud (or your own cloud) select “Provider-hosted” option.


Once you say finish, Your App Solution structure will be like this :

If you notice this, there is one feature, some css, image , javascript files along with a default.aspx page.
This default.aspx page is the landing page of your app site (When you deploy your app a site will be created and this page will be the home page of this site).
If you have look at to the Default.aspx page, you will find a head and main place holder and references to the App.css and App.js files. Along with this it calls the sharePointReady function of App.js file.
In this default page im writing a content with the h1 tags like this


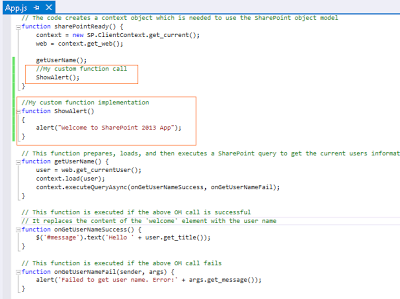
In App.js by default CSOM code will be there. Here Sharepoint Ready function calling the  getUserName function. Now I am adding a simple function called ShowAlert(), just to show an alert when we access the app. Check this

Now build the project and then try to deploy it. You will find this below error (if you are trying to deploy the app for the first time without service apps creation and app domain creation).


The reason for this deployment error is you need set some prerequisite settings before deploying the app. These are the below settings/configurations to install and configure the apps in SP2013 successfully. 
·         Create an Isolated domain for the app
·         Create/Configure the App Management Service
·         Create/Configure the Subscription Settings Service

Creating Isolated Domain for the Apps :
Create the app domain using PowerShell cmdlets (There are some other approaches to create the app domain but I am showing here with the PowerShell as i am deploying in a single server work group environment )
Step 1 : 
Open the SharePoint 2013 Management PowerShell with Admin rights
Check the Admin and timer services running or not (if you say start it will start if they are stopped) with these commands
 

net start spadminv4
net start sptimerv4

For continuation click here..Developing a SharePoint-Hosted App in SharePoint 2013 Part -II

Developing a SharePoint-Hosted App in SharePoint 2013 Part -II


Continuation to the post Developing a SharePoint-Hosted App in SharePoint 2013 Part -I .

Once we verified that the above services are running do these next steps..

Step 2 :

Now we need to create domain for apps and register this domain to sharepoint. So that our apps will be hosted separately when we deploy them.
Run this PowerShell command to create the app domain. You should be an administrator with the Managed Account. Here my domain name is nature.com
So for naming conventions (or to follow principles J) , If your domain name is nature.com, give your domain name for apps as like natureapps.com
Set-SPAppDomain  "natureapps.com".
Now we need to create the AppManagement and subscription service applications as mentioned above.
Step 3 :
Creating the App Management and Subscription Setting Service applications
Ensure that the SPSubscriptionSettingsService and AppManagementServiceInstance services are running with these below cmdlets(if they are not running this cmdlet will make them to run)
Get-SPServiceInstance | where{$_.GetType().Name -eq "AppManagementServiceInstance" -or $_.GetType().Name -eq "SPSubscriptionSettingsServiceInstance"} | Start-SPServiceInstance
You will get this message if they are already running

 If you will not get this message, check whether they are started or not by going to
Central AdministrationàManage services on server under System Settings category

These services are running now, so the next step is we need to create the respective service applications with the below cmdlets. To do this you should have a SPManagedAccount.(or u can run with farm admin if it is a managed account).
If you want to create new managed account follow these steps : This **** marked step is optional if you have already a managed account
*****************************************
$account= New-SPManagedAccount
It will ask the credentials for the user to whom you want to make the Managed Account(in my case im giving farm admin  credentials itself, since i want to use my farm admin as a managed account for this )
******************************************
Now create the service apps with below cmdlets using this Managed Account.
$account = Get-SPManagedAccount “nature\administrator”(your domain name\user name)

$appPoolSubSvc = New-SPServiceApplicationPool -Name SettingsServiceAppPool -Account $account
$appPoolAppSvc = New-SPServiceApplicationPool -Name AppServiceAppPool -Account $account

$appSubSvc = New-SPSubscriptionSettingsServiceApplication –ApplicationPool $appPoolSubSvc –Name SettingsServiceApp –DatabaseName SettingsServiceDB
$proxySubSvc = New-SPSubscriptionSettingsServiceApplicationProxy –ServiceApplication $appSubSvc
$appAppSvc = New-SPAppManagementServiceApplication -ApplicationPool $appPoolAppSvc -Name AppServiceApp -DatabaseName AppServiceDB
$proxyAppSvc = New-SPAppManagementServiceApplicationProxy -ServiceApplication $appAppSvc
 If you notice the above cmdlets, here we are creating the AppManagement Service application and SubscriptionSettingsServiceApplication. This will create two databases too.

Check this Msdn url to get all the cmdlets at a place.
So now lets verify whether these service applications are created or not .
Go to Central Administration àApplication Management àManage service applications check these two

And also verify ourAppdomain(natureapps.com) configured or not. Go to Central AdministrationàSelect Apps àThen select Configure App Urls under App Management.

Now you can find the App Domain as “natureapps.com”.And give app prefix for the app. This will be used in the app url. Here I have given as “spapps”.And says OK.(This app prefix can be given through powershell as like appdomain name, but i missed it).
With these, you have completed the settings required to deploy the sharepoint-hosted App. Now try to deploy the app. Once it got deployed successfully you will find this message in the output window

If you notice this message, it is showing that the app is successfully installed at
Here
Spapp  - is the prefix what we have provided just now
cdab466a043db3- is the app id dynamically generated one
natureapps.com- is our app domain name
SharePointDemoApp1- is our app name
Now check the app from the SharePoint site (where we deployed our visual studio app solution ) à Site ContentsàCheck our App .

Now Click on it.It will redirect to our app site.( http://spapp-cdab466a043db3.natureapps.com/SharePointDemoApp1/.)

So FINALLY we achieved it...
Hope this will helpful ...Thanks.