Hi Guys,
In this post I am going to explain a basic level of the Record Management concept in Sharepoint 2010.Records Management by name itself “Managing the Records”. We can say It is an approach or a way to manage the records in a flexible fashion for further needs. For example I have 100 docs in my library, I need to send some of these docs to another specified location for archival purpose (like a storage).We will use this process to achieve this.
In Simple my aim is : I should be able to send my docs to another Location(Here Records Center).
Here are the steps to implement this
Here I am sending the docs in my Shared documents to Records Center

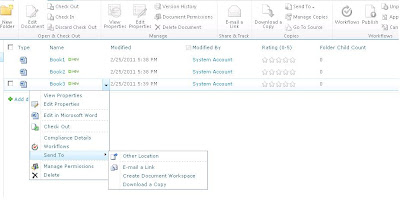
Select a document and click on Send To Option as below, You will not find any location(record center) to send
Go to site Actions-->New Site-->Select Records Center
Give Title and Url
Title : MPC Records Center
Url : http://MyServername:port/MPCRecordCenter/default.aspx
The Record Center Creation is Now done.
I need to send my documents in Shared Documents to this Records Center. For this I need to set a communication path between these so go for
Central Administration-->General Application Settings-->Under External Service ConnectionsConfigure send to Connections
Then you will be redirected to Configure Send To Connections Page
In Connection Settings section give the following
Display Name : give a display name what you want to appear when a document is selected “Send To” Menu option (Here I am giving MPCRecordsCenter)
Send To URL : Give the URL of the Records Center Which we have created earlier(http://MyServername:port/MPCRecordCenter/default.aspx)
Check the box allow manual submission from send to menu
Send To Action : Copy, Move, Move and Leave a Link
Here I am selected Copy (When I am sending (using “Send To” option) the document to record center I don’t want to remove from Shared documents. If you select Move it will be moved to Records Center and disappears in Shared documents)
Explanation : Just give a small desc..
Click on Add Connection Button. A connection will be established to the Document Library and the Record Center which we created earlier.
Click on it. It will pop up saying “Do u want to copy this doc to MPCRecord Center”. Click OK. A page will be opened with the status and Url of the copied document in Record Center. Click on that link (or Check the Record Center ‘s Drop-off Library , you will find this document.)
Source Links: http://technet.microsoft.com/en-us/library/ee424395.aspx
http://blogs.pointbridge.com/Blogs/2010wave/Pages/Post.aspx?_ID=37
http://grounding.co.za/blogs/neil/archive/2008/03/04/setting-up-a-record-centre-in-sharepoint.aspx
Enjoy Reading..!


Thanks so much Puma! I've been meaning to ask, how come you are so familiar with the area? Do you work in the record management field? And where did you learn operating this software from?
ReplyDeleteGood post puma. You are making a nice sharing . Thanks for bringing this up.
ReplyDeleteThank u..
DeleteIt's pretty helpful,i should recommended it to my freinds.
ReplyDeleteNice Information about Record Center
ReplyDeleteSharepoint 2010 Archiving