This is a continuation to my previous post.Step by Step Guide to Create Provider Hosted App in Sharepoint 2013 Online with Azure Hosting Model- Part 2
Now let’s write the business logic which you required. Here
Just I am placing some div with text in default.aspx.
Next step is we need to register the client id and client
secret in sharepoint site and use them in our app. (What is this Client id and
Client secret??- Big QuestionJ,)
But I am not going to write details about it in this post…L ). Let’s concentrate
on the steps to generate…
Generating Client Id and Client Secret in Sharepoint Online Site:
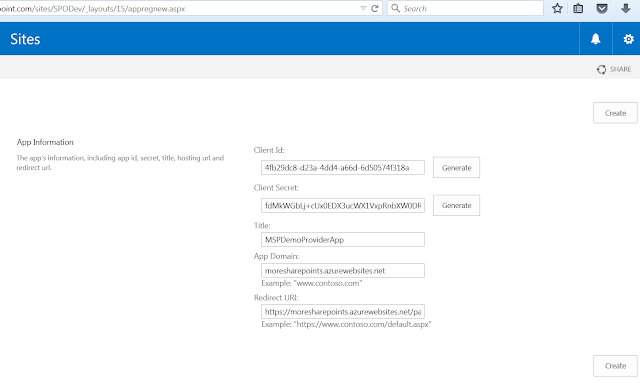
Go to the _layouts/15/appregnew.aspx page in your SharePoint site and generate client id, client secret and give the details as shown in following screen.
Title: MSPDemoProviderApp
AppDomain : Give the domain of the azure website(don’t provide
http/https). In our case, it is
moresharepoints.azurewebsites.net
Redirect Url : Give the url of the azure web page where your app
need to redirect/land.
The reason to give above url is,
we are hosting appwebproject in to azure website. So our page default.aspx is
placed in to azure site. Here we are saying the app that, go/redirect to
default.aspx page in azure website upon its click.
Say Create. And save the
information in to note pad.
Now we are ready with client id,
client secret etc. We will use this information in our appsolution.
Go to
AppManifest.xml in AppProject(MSPProviderHostedDemo), set the
required settings Title, Version , Start Page etc.. like below.
Permissions: Here I am setting
Web : Full Control. Anyhow we are not dealing with any sharepoint functionality
here.. But just to show you the app permissions tab, here I am giving this.
Now Right Click on AppManifest
file and say view code.
Replace the Clinet Id * with the
above generated client id. Like this.
And also update the Client Id and Client Secret in web.config
of app webproject (MSPProviderHostedDemoWeb )with the generated Ids like below.
With this the required settings to host the app are
completed in our visual studio solution. Now let’s publish the appwebproject in
to azure site.
Publish the appwebsite into azure:
Say Import and select Import from a publish profile file.
Then browse and select the azure profile which you
downloaded in above steps.( moresharepoints.azurewebsites.net.PublishSettings)
Now it shows the connection information like below
Click the Validate connection, it should passed. Then Click
Next.In Settings Window, Select Configuration as Release like
below.
Then
say next. Click Start Preview to see what files are going to place in azure.
For the first time it publishes all your appwebproject files. From next time
onwards, when you say publish it will only publish the modified files.
Now say Publish. In the OutPut window of visual studio it
says “Publishe Successed” for successful publish.
With this the appwebsite publishing to azure is completed.. Lets Publish the app in to sharepoint online site in next post..
Refer Part4 for the continuation..
Refer Part4 for the continuation..


Really thanks for providing your blog, i want to learn more thing on Azure. And you also want to get more knowledge on Azure then Get touch with Azure Online Training
ReplyDelete