Mar 2, 2011

BCS in Sharepoint 2010-Part 1

Hi 

Here I am going to show a small demo about how to connect to external data source and showing the external data in to sharepoint site using BCS(Business Connectivity Services).

Small Introduction about BCS:

BCS is an upgraded feature for the BDC (Business Data Catalog) of MOSS. BCS allows us to connect the external data(SQL,SAP,Webservices etc) .We can read and edit the data. This provides us the bidirectional (read or write) communication between our SharePoint site/list with the External data. (Where as in BDC only we can retrieve/read the data from external database).


You can find more information on BCS here.


Here my external data source is MS SQL server and database is BCS_DemoEmp. I have table called tblEmployee as shown below.


Now I want to integrate this data in to my sharepoint site.to Integrate External data in to our SharePoint site, first we need to create an external content type. (Info on External Content type here.) We can do this using SharePoint designer and some other ways but using designer is most easy way. Here I am creating the external content type using Sharepoint Designer 2010.


Open the Sharepoint Designer 2010-->Open your site-->Select Site Tab in the Ribbon and Select External Content Types in left navigation


Then Select External Content Types as shown below


Select  Office Item Type : Generic List
Office Sync External List : Enabled
Click on Click here to “discover external source and define operations” link as below.


Then
Click Add Connection --> select  Data source type : SQL Server
Give your sql connection details


Click Ok. It will connect to your database server and displays the database.Select your table(tblEmployee) and right click-->New Read Item Operation

 
Operation Properties Wizard will be open. Do the needed settings as below


If any warnings or errors it will show. Here no warnings and errors. Click Next

 
This is Input Parameters Wizard. Here you will find the Data Source Elements (Table columns) and right side section shows the properties of this element. You should map at least one data source element as Identifier (Check the “Map to Identifier”) if not you will get the error.(see by unchecking it)

Click Next


Continuation is in next part   BCS in Sharepoint 2010-Part2


BCS in Sharepoint 2010-Part 2

.....continuation part for BCS in Sharepoint 2010-Part 1

Click Finish.


Then it will be navigated back to your External Content Types Screen. There you will find an warning saying This External content type doesn’t include the Read List Operation..as show below.


So select table and right click and select New Read List Operation


A wizard will be open (as in Read Item Operation)


Click Next if no errors/warnings.


In Filter Parameters step a warning saying Limit filter should be added. So click Add Filter Parameter button to add


Select Use Existing : Filter
Filter Type : Limit
Filter Field : Emp Id
And give default value 1(Emp Id)(see right side of parent window). then click Next


In this step you will see some warnings. Make sure the properties as below to avoid

 
Click Finish.

Then you will be navigated to previous screen with this message.


Save this External Content Type. You will find it in the Left Pane.


Now the External Content Type is Created Successfully.

Continuation is in next part BCS in Sharepoint 2010-Part 3

BCS in Sharepoint 2010-Part 3

....Continuation to BCS in Sharepoint 2010-Part2

External Content Type creation is completed .Now create a list using this content type.

Select  Create Lists & Froms option in the Ribbon


Give the name, description etc as below

Click Ok.
A list will be created with this name( EmployeeInfo_BCS) in the site.


The list creation is done. But the logged in user not having the permission to this.So it is showing error "Access denied by Business Data Connectivity".

Follow the below steps to give the permissions

Go to Central Administration-->Manage service applications under Application Management -->
then Select Business Data Connectivity Service-->Select our External Content type.And Right Click on it and


Select Set Permissions
And add the required users and give the permission as above. Now Click Ok and Back to your list (EmployeeInfo_BCS).


You will find the data. (It is similar to your database table).If you do any modifications in database it will be effected here.

Note :Here I have done Read List and Read List Item Operations only for the External content type so I can only read the data from the external database. You can create the other operations like Create, Update,Delete etc as shown below.


So that  if you create,update or delete the items in the Sharepoint  List it will be effected to your external data source.


Mar 1, 2011

Showing Related List Items in List Display Form Sharepoint 2010

Hi,


This is a new feature came with sharepoint 2010 list. Here I am going to explain List Relations feature using the Lookup column and showing the associated list items of a list Item.

List 1 :  Groups

Columns : Title(Single line of text)

Add items in this List .

List 2 :   Students

Columns : StudentId (Single line of text)
                     Group (Lookup)

For column Group do the settings as below
Get Information from : Groups
In this Column :               Title
Check  Enforce Relationship Behavior checkbox
Select Restrict Delete (When an item in the target list is deleted, cascade delete will delete all related items in this list. Restrict delete will prevent the deletion of an item in the target list if it has one or more related items in this list)


Now add items to Students List.

Now we are going to show the associated List Items(students) of Group
Select Groups List à Select List In Ribbon àSelect  Modify Form Webparts and in that Select Default Display Form option(as shown below)


Then select the Insert Option in the Ribbon and Click Related List. You will see “Students”

Click Students.


Then the Students List Webpart with the heading “Related Items in Students” will be added to the page.


Now save the page. (Or Select Groups List).


Select a item in Groups list (eg : Electronics Engineering) , you will find the related students under that.


Enjoy Reading...

Feb 28, 2011

Twitter in SharePoint CEWP

Hi,

To get the twitter tweets/feeds in to your sharepoint do this simple work. Open your site and add a CEWP (Content Editor Webpart) to the page. And add the following java script in to that


script src="http://widgets.twimg.com/j/2/widget.js">< /script ( Here I have missed open brace'<' and closed brace '>'  to show script to you )

And write the below in the script tags

new TWTR.Widget({
version: 2,
type: 'profile',
rpp: 5,
interval: 6000,
width: 200,
height: 500,
theme: {
shell: {
background: '#F45C00',
color: '#ffffff'
},
tweets: {
background: '#000000',
color: '#ffffff',
links: '#4aed05'
}
},
features: {
scrollbar: true,
loop: false,
live: true,
hashtags: true,
timestamp: true,
avatars: true,
behavior: 'all'
}
}).render().setUser('SharePoint2010').start();


The source of the java script file taken from http://widgets.twimg.com/j/2/widget.js.

Note : Here the type of the display is Profile. And also u can show the list . HereI have set the value of the setUser property is Sharepoint2010(http://twitter.com/SharePoint2010) .Instead you can display your own feeds/tweets by giving your twitter account over there(ex:.render().setUser('purnamadugula').start();).Also you can show  the list and customize the user interface...

Here is the more information on this:

Source Links :

http://www.readwriteweb.com/archives/10_twitter_list_widgets_you_can_grab_embed_right_n.php
http://bombshelter.org/TweetCode.txt

Feb 25, 2011

Record Center in Sharepoint 2010

 Hi Guys,

In this post I am going to explain a basic level of the Record Management concept in Sharepoint 2010.Records Management by name itself “Managing the Records”. We can say It is an approach or a way to manage the records in a flexible fashion for further needs. For example I have 100 docs in my library, I need to send some of these docs to another specified location for archival purpose (like a storage).We will use this process to achieve this.
In Simple my aim is : I should be able to send my docs to another Location(Here Records Center).

Here are the steps to implement this

Here I am sending the docs in my Shared documents to Records Center


Select a document and click on Send To Option as below, You will not find any location(record center) to send

For  this I am going to create a site using Records Center template

Go to site Actions-->New Site-->Select Records Center

Give Title and Url
Title : MPC Records Center
Url : http://MyServername:port/MPCRecordCenter/default.aspx


The Record Center Creation is Now done.

I need to send my documents in Shared Documents to this Records Center. For this I need to set a communication path between these so go for

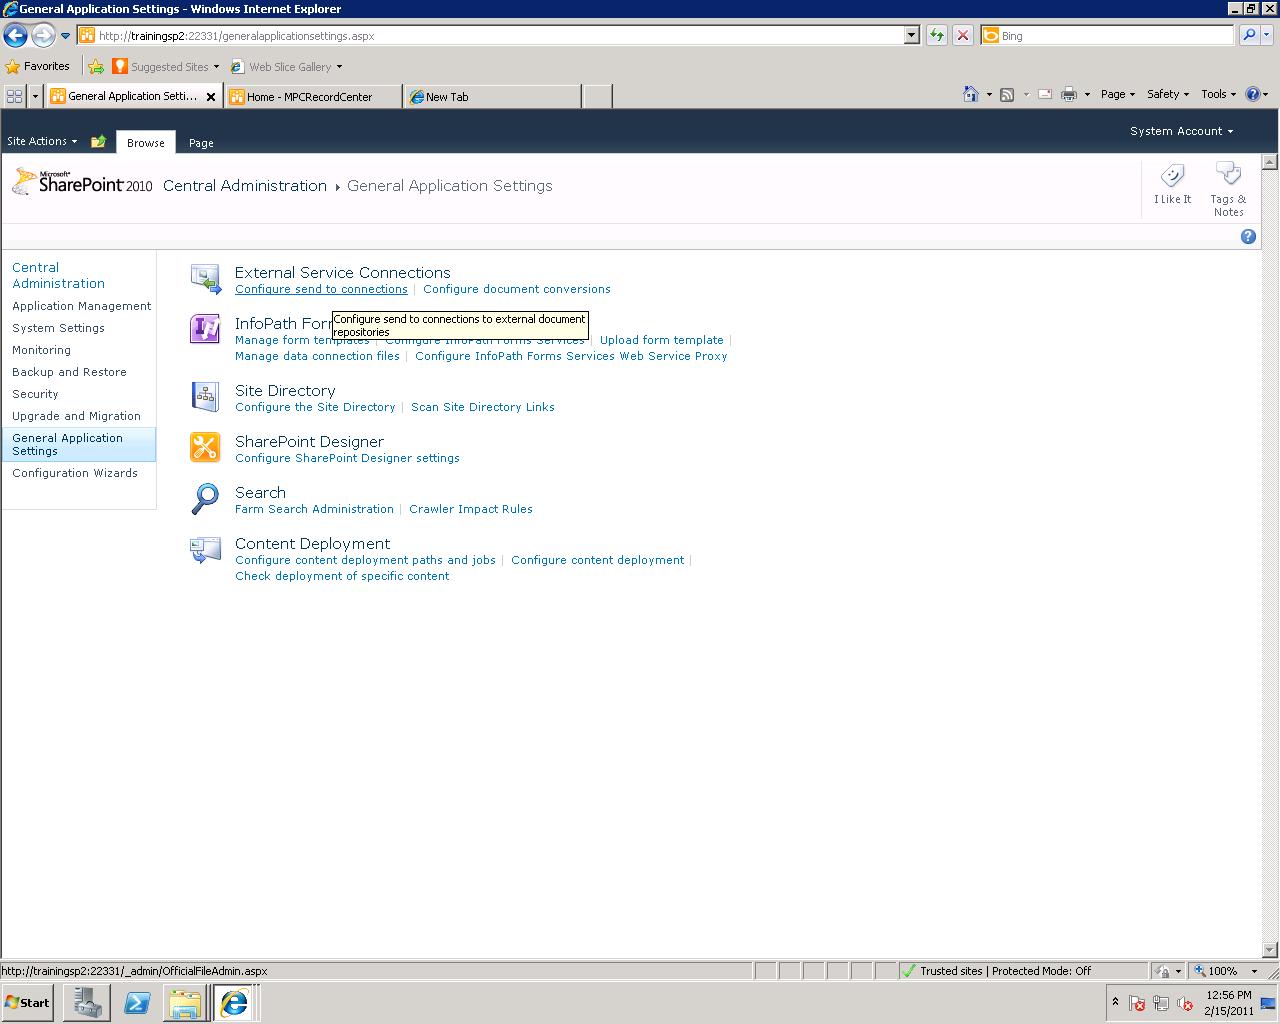
Central Administration-->General Application Settings-->Under External Service ConnectionsConfigure send to Connections


Then you will be redirected to Configure Send To Connections Page


Select the webApplication (where you have Shared document ), Check the Allow sites to send to connections outside the site subscription(if u need) and in Send To Connections

In Connection Settings section give the following

Display Name : give a display name what you want to appear when a document is selected “Send To” Menu option (Here I am giving MPCRecordsCenter)

Send To URL : Give the URL of the Records Center Which we have created earlier(http://MyServername:port/MPCRecordCenter/default.aspx)

Check the box allow manual submission from send to menu

Send To Action : Copy, Move, Move and Leave a Link

Here I am selected Copy (When I am sending (using “Send To” option) the document to record center I don’t want to remove from Shared documents. If you select Move it will be moved to Records Center and disappears in Shared documents)

Explanation : Just give a small desc..

Click on Add Connection Button. A connection will be established to the Document Library and the Record Center which we created earlier.

So go for our Shared Documents and click on a document (here Book3.docx) and select “Send To” option from the context menu. You will find the Record Center name (MPCRecordCenter) which we have created earlier


Click on it. It will pop up saying “Do u want to copy this doc to MPCRecord Center”. Click OK. A page will be opened with the status and Url of the copied document in Record Center. Click on that link (or Check the Record Center ‘s Drop-off Library , you will find this document.)

There are different methods and scenarios to manage the records using records center. Here I have explained just basic level of Record Management. For further information go to these links


Source Links: http://technet.microsoft.com/en-us/library/ee424395.aspx
http://blogs.pointbridge.com/Blogs/2010wave/Pages/Post.aspx?_ID=37
http://grounding.co.za/blogs/neil/archive/2008/03/04/setting-up-a-record-centre-in-sharepoint.aspx

 
Enjoy Reading..!


Rating Feature for Sharepoint 2010 Document Library


In 2010 a new feature is introduced for rating the documents in doc library..I will explain here how to rate the documents and what are things we need to set to get this feature...

Open the Document library(here my library name is BOOKS) which you want to set the rating feature.


Go for Doc Library Settings-->Rating Settings-->Select Yes under "Allow items in this list to be rated


Click Ok 
Then you will find the rating column in your document library as follows


Give Rating to the Docs(select the rating Stars.) You will notice that the rating will be applied.But upon refreshing the page ,the applied rating will be disappear.
This is due to By default the Timer Job(Social Rating Syncronization) related to this service is set to run for every hour. Instead if you want to change to minutes/some other you have to change the settings as follows

Central AdministrationàMonitoringà Select Review Job Definations


In that Select User Profile Service Application-Social Rating Synchronization Job


Then you will be navigated to the Timer Job Edit page
In Recurring Schedule section "This timer job is scheduled to run " Hourly by default. Change it to minutes (here i kept it to 2 mins)


Click on Run Now Button
Now go back to your document library  and give rating to a document


It works ..